★ 可以直接複製貼上到 C 語言開發環境中,此程式碼可以直接編譯執行(只要你配置好開發環境與硬體)。
說明:這篇程式碼有點長~~~,不過可以保證編譯可以通過,PB6=I2C-SCL、PB7=I2C-SDA、PB10=UART-Tx、PB11=UART-Rx,UART 包率為 9600
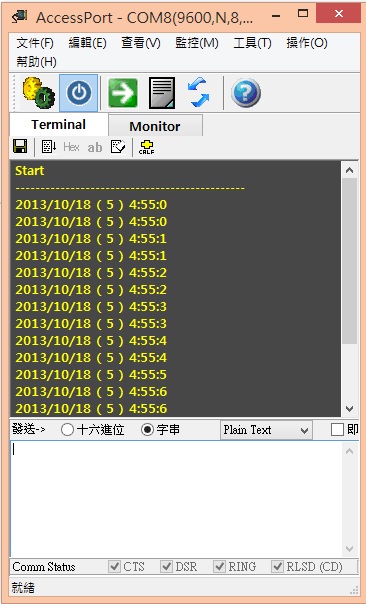
輸出結果:

程式碼:
#include "stm32f10x.h"
輸出結果:

程式碼:
#include "stm32f10x.h"
#include "stdio.h"
#define DS1307_I2C_ADDRESS 0x68 << 1 // DS1307 I²C 地址
int i;
int y, m, d, w, h, mi, s; // 月/日/週/時/分/秒
void Init_I2C() {
I2C_InitTypeDef I2C_InitStructure;
GPIO_InitTypeDef GPIO_InitStructure;
/* 啟用 I2C */
I2C_Cmd(I2C1,ENABLE);
/* 啟用 I2C1 RCC 時鐘 */
RCC_APB1PeriphClockCmd(RCC_APB1Periph_I2C1, ENABLE);
RCC_APB2PeriphClockCmd(RCC_APB2Periph_GPIOB, ENABLE);
/* 設定 I2C1 的 SDA 與 SCL 腳位 */
/* PB6 = SCL ,PB7 = SDA */
GPIO_InitStructure.GPIO_Pin = GPIO_Pin_6 | GPIO_Pin_7;
GPIO_InitStructure.GPIO_Speed = GPIO_Speed_50MHz;
GPIO_InitStructure.GPIO_Mode = GPIO_Mode_AF_OD;
GPIO_Init(GPIOB, &GPIO_InitStructure);
/* 設定 I2C1 */
I2C_InitStructure.I2C_Mode = I2C_Mode_SMBusHost;
I2C_InitStructure.I2C_DutyCycle = I2C_DutyCycle_2;
I2C_InitStructure.I2C_OwnAddress1 = 0x00; // STM32 自己的 I2C 地址
I2C_InitStructure.I2C_Ack = I2C_Ack_Enable;
I2C_InitStructure.I2C_AcknowledgedAddress = I2C_AcknowledgedAddress_7bit;
I2C_InitStructure.I2C_ClockSpeed = 100000 ; // 設定 I2C 時鐘速度為 100K
I2C_Init(I2C1, &I2C_InitStructure);
}
/* 發送開始信號
* 發送到 "從設備 (Slave Device)" 地址 + R/W bit
*
* 參數:
* I2Cx --> I2C 外設,例如:I2C1
* address --> 7 bit 的 "從設備 (Slave Device)" 地址
* direction --> 設定方向,例如:
* I2C_Direction_Tranmitter 為 主發送模式
* I2C_Direction_Receiver 為 主接收模式
*/
void I2C_start(I2C_TypeDef* I2Cx, uint8_t address, uint8_t direction){
// 等待 I2C1 不忙的時候...
while(I2C_GetFlagStatus(I2Cx, I2C_FLAG_BUSY));
// 對 I2C1 發送啟動信號
I2C_GenerateSTART(I2Cx, ENABLE);
// 等待 I2C1 EV5 --> 從 從設備 (Slave Device) 確認啟動信號
while(!I2C_CheckEvent(I2Cx, I2C_EVENT_MASTER_MODE_SELECT));
// Send slave Address for write
I2C_Send7bitAddress(I2Cx, address, direction);
/* 等待 I2C1 EV6, 並判斷 I2C 方向:
* 如果是 I2C_Direction_Tranmitter 則設定為 主發送模式
* 如果是 I2C_Direction_Receiver 則設定為 主接收模式
*/
if(direction == I2C_Direction_Transmitter){
while(!I2C_CheckEvent(I2Cx, I2C_EVENT_MASTER_TRANSMITTER_MODE_SELECTED));
} else if(direction == I2C_Direction_Receiver){
while(!I2C_CheckEvent(I2Cx, I2C_EVENT_MASTER_RECEIVER_MODE_SELECTED));
}
}
/* 發送一個 byte 到 "從設備 (Slave Device)"
*
* 參數:
*I2Cx --> I2C 的外設,例如:I2C1
*data --> 要發送的 byte 資料
*/
void I2C_write(I2C_TypeDef* I2Cx, uint8_t data)
{
I2C_SendData(I2Cx, data);
// 等待 I2C1 EV8_2 --> 已發送一個 byte
while(!I2C_CheckEvent(I2Cx, I2C_EVENT_MASTER_BYTE_TRANSMITTED));
}
/* 從 "從設備 (Slave Device)" 讀取一個 byte
* 並請求後面一個 byte
*/
uint8_t I2C_read_ack(I2C_TypeDef* I2Cx){
uint8_t data;
// 啟用 確認設定接收資料
I2C_AcknowledgeConfig(I2Cx, ENABLE);
// 等待接收到一個 byte
while( !I2C_CheckEvent(I2Cx, I2C_EVENT_MASTER_BYTE_RECEIVED) );
// 從 I2C 佔存器讀取一個 byte 並回傳
data = I2C_ReceiveData(I2Cx);
return data;
}
/* 從 "從設備 (Slave Device)" 讀取一個 byte
* 且之後就不再接收資料
*/
uint8_t I2C_read_nack(I2C_TypeDef* I2Cx){
uint8_t data;
// disabe acknowledge of received data
// nack also generates stop condition after last byte received
// see reference manual for more info
I2C_AcknowledgeConfig(I2Cx, DISABLE);
I2C_GenerateSTOP(I2Cx, ENABLE);
// 等待收到一個 byte
while( !I2C_CheckEvent(I2Cx, I2C_EVENT_MASTER_BYTE_RECEIVED) );
// 從 I2C 佔存器讀取一個 byte 並回傳
data = I2C_ReceiveData(I2Cx);
return data;
}
/* 發送停止信號
* 釋放 I2C 匯流排
*/
void I2C_stop(I2C_TypeDef* I2Cx){
// 停止 I2C1
I2C_GenerateSTOP(I2Cx, ENABLE);
}
void My_Usart1_Send(char *string){
while(*string){
/* 傳送訊息至 USART1 */
USART_SendData(USART1, (unsigned short int) *string++);
/* 等待訊息傳送完畢 */
while (USART_GetFlagStatus(USART1, USART_FLAG_TC) == RESET);
}
}
void Init_UART(){
/******** 宣告 USART、GPIO 結構體 ********/
GPIO_InitTypeDef GPIO_InitStructure;
USART_InitTypeDef USART_InitStructure;
/******** 啟用 GPIOA、USART1 的 RCC 時鐘 ********/
RCC_APB2PeriphClockCmd(RCC_APB2Periph_GPIOA|RCC_APB2Periph_USART1, ENABLE);
/******** 設定 PA9 為 Tx 覆用 ********/
GPIO_InitStructure.GPIO_Pin = GPIO_Pin_9;
GPIO_InitStructure.GPIO_Speed = GPIO_Speed_50MHz;
GPIO_InitStructure.GPIO_Mode = GPIO_Mode_AF_PP;
GPIO_Init(GPIOA, &GPIO_InitStructure); // 初始化 PA9
/******** 設定 PA10 為 Rx 覆用 ********/
GPIO_InitStructure.GPIO_Pin = GPIO_Pin_10;
GPIO_InitStructure.GPIO_Mode = GPIO_Mode_IN_FLOATING;
GPIO_Init(GPIOA, &GPIO_InitStructure); // 初始化 PA10
/******** USART 基本參數設定 ********/
USART_InitStructure.USART_BaudRate = 9600;
USART_InitStructure.USART_WordLength = USART_WordLength_8b;
USART_InitStructure.USART_StopBits = USART_StopBits_1;
USART_InitStructure.USART_Parity = USART_Parity_No;
USART_InitStructure.USART_HardwareFlowControl = USART_HardwareFlowControl_None;
USART_InitStructure.USART_Mode = USART_Mode_Rx | USART_Mode_Tx;
USART_Init(USART1, &USART_InitStructure); // 初始化 UART1
USART_Cmd(USART1, ENABLE); // 啟用 USART1
}
// BCD 轉 DEC
int bcdTodec(int val){
return ((val / 16 * 10) + (val % 16));
}
// DEC 轉 BCD
int decToBcd(int val){
return ((val / 10 * 16) + (val % 10));
}
// 設定時間
void setTime(int y, int m, int d, int w, int h, int mi, int s){
I2C_start(I2C1, DS1307_I2C_ADDRESS, I2C_Direction_Transmitter); // 在 主模式(Master Mode) 中 開始準備發送
I2C_write(I2C1, 0x00); // 寫入一個 byte 到 DS1307 模組
I2C_write(I2C1, decToBcd(s)); // 寫入秒
I2C_write(I2C1, decToBcd(mi)); // 寫入分
I2C_write(I2C1, decToBcd(h)); // 寫入時
I2C_write(I2C1, decToBcd(w)); // 寫入星期
I2C_write(I2C1, decToBcd(d)); // 寫入日
I2C_write(I2C1, decToBcd(m)); // 寫入月
I2C_write(I2C1, decToBcd(y)); // 寫入年
I2C_stop(I2C1); // 停止發送
}
// 取得時間
void getTime(){
I2C_start(I2C1, DS1307_I2C_ADDRESS, I2C_Direction_Transmitter); // 在 主發送 模式中 準備開始 發送
I2C_write(I2C1, 0x00); // 寫入一個 byte 到 DS1307 模組
I2C_stop(I2C1); // 停止發送
I2C_start(I2C1, DS1307_I2C_ADDRESS, I2C_Direction_Receiver); // 在 主接收 模式中 準備開始 接收
s = bcdTodec(I2C_read_ack(I2C1)); // 取得秒
mi = bcdTodec(I2C_read_ack(I2C1)); // 取得分
h = bcdTodec(I2C_read_ack(I2C1)); // 取得時
w = bcdTodec(I2C_read_ack(I2C1)); // 取得星期
d = bcdTodec(I2C_read_ack(I2C1)); // 取得日
m = bcdTodec(I2C_read_ack(I2C1)); // 取得月
y = bcdTodec(I2C_read_ack(I2C1)) + 2000; // 取得年
I2C_read_nack(I2C1); // 讀取一個 byet 後,就不再讀取後面一個 byte (停止傳輸)
}
// 顯示時間
void digitalClockDisplay(){
char buff [] = "";
sprintf (buff, "%d", y); // 將數字(年)轉成字串 (String)
My_Usart1_Send(buff); // 輸出年
My_Usart1_Send("/");
sprintf (buff, "%d", m); // 將數字(月)轉成字串 (String)
My_Usart1_Send(buff); // 輸出月
My_Usart1_Send("/");
sprintf (buff, "%d", d); // 將數字(日)轉成字串 (String)
My_Usart1_Send(buff); // 輸出日
My_Usart1_Send(" ( ");
sprintf (buff, "%d", w); // 將數字(星期)轉成字串 (String)
My_Usart1_Send(buff); // 輸出星期
My_Usart1_Send(" ) ");
sprintf (buff, "%d", h); // 將數字(時)轉成字串 (String)
My_Usart1_Send(buff); // 輸出時
My_Usart1_Send(":");
sprintf (buff, "%d", mi); // 將數字(分)轉成字串 (String)
My_Usart1_Send(buff); // 輸出分
My_Usart1_Send(":");
sprintf (buff, "%d", s); // 將數字(秒)轉成字串 (String)
My_Usart1_Send(buff); // 輸出秒
My_Usart1_Send("\n");
}
int main(){
Init_I2C(); // 初始化 I2C
Init_UART(); // 初始化 UART
setTime(13, 10, 18, 5, 4, 55, 0); // 設定時間:2013 年 10 月 18 日 星期五 4 點 52 分 0 秒
My_Usart1_Send(" Start \n");
My_Usart1_Send("---------------------------------------------- \n");
while(1){
getTime(); // 取得時間
digitalClockDisplay(); // 顯示時間
for(i=0; i<1000000; i++); // 延遲
}
}
全站熱搜


 留言列表
留言列表