★ 可以直接複製貼上到 C 語言開發環境中,此程式碼可以直接編譯執行(只要你配置好開發環境與硬體)。
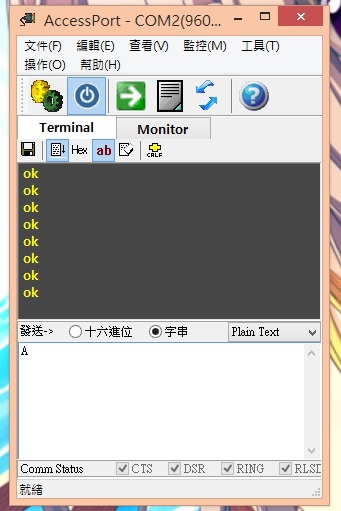
執行結果:( 手動輸入 A 才會顯示 ok )
程式碼:
#include "stm32f4xx.h"
void My_Usart3_Printf(char *string){
while(*string){
/* 傳送訊息至 USART3 */
USART_SendData(USART3, (unsigned short int) *string++);
/* 等待訊息傳送完畢 */
while (USART_GetFlagStatus(USART3, USART_FLAG_TC) == RESET);
}
}
void Uart_Init(){
/******** 宣告 USART、GPIO 結構體 ********/
USART_InitTypeDef USART_InitStructure;
GPIO_InitTypeDef GPIO_InitStructure;
/******** 啟用 GPIOC、USART3 的 RCC 時鐘 ********/
RCC_AHB1PeriphClockCmd(RCC_AHB1Periph_GPIOC, ENABLE);
RCC_APB1PeriphClockCmd(RCC_APB1Periph_USART3, ENABLE);
/******** 將 PC10、PC11 連接至 USART3 ********/
GPIO_PinAFConfig(GPIOC, GPIO_PinSource10, GPIO_AF_USART3);
GPIO_PinAFConfig(GPIOC, GPIO_PinSource11, GPIO_AF_USART3);
/******** 設定 PC10 為 Tx 覆用 ********/
GPIO_InitStructure.GPIO_OType = GPIO_OType_PP; // 使用推挽式輸出
GPIO_InitStructure.GPIO_PuPd = GPIO_PuPd_UP; // 使用上拉電阻
GPIO_InitStructure.GPIO_Mode = GPIO_Mode_AF; // 設置為覆用
GPIO_InitStructure.GPIO_Pin = GPIO_Pin_10; // 設定第 10 腳
GPIO_InitStructure.GPIO_Speed = GPIO_Speed_50MHz; // 設定 GPIO 速度為 50 MHz
GPIO_Init(GPIOC, &GPIO_InitStructure); // 套用以上 GPIO 設置,並初始化 GPIOC
/******** 設定 PC11 為 Rx 覆用 ********/
GPIO_InitStructure.GPIO_Mode = GPIO_Mode_AF; // 設置為覆用
GPIO_InitStructure.GPIO_Pin = GPIO_Pin_11; // 設定第 11 腳
GPIO_Init(GPIOC, &GPIO_InitStructure); // 套用以上 GPIO 設置,並初始化 GPIOC
/******** USART 基本參數設定 ********/
USART_InitStructure.USART_BaudRate = 9600; // 設定 USART 包率 (每秒位元數) 為 9600
USART_InitStructure.USART_WordLength = USART_WordLength_8b; // 設定 USART 傳輸的資料位元為 8
USART_InitStructure.USART_StopBits = USART_StopBits_1; // 設定 USART 停止位元為 1
USART_InitStructure.USART_Parity = USART_Parity_No; // 不使用同位元檢查
USART_InitStructure.USART_HardwareFlowControl = USART_HardwareFlowControl_None; // 不使用流量控制
USART_InitStructure.USART_Mode = USART_Mode_Rx | USART_Mode_Tx; // 設定 USART 模式為 Rx (接收) 、 Tx (傳送)
USART_Init(USART3, &USART_InitStructure); // 套用以上 USART 設置,並初始化UART3
/******** 啟用 USART3 ********/
USART_Cmd(USART3, ENABLE);
/*啟用&設定接收中斷*/
USART_ITConfig(USART3, USART_IT_RXNE, ENABLE);
/* 啟用 USART3 中斷 */
NVIC_EnableIRQ(USART3_IRQn);
}
int main(){
Uart_Init();
while(1){
}
}
// 中斷涵式 (方法)
void USART3_IRQHandler(){
if(USART_GetITStatus(USART3, USART_IT_RXNE) != RESET){
// 如果收到 A 字元,則發送 ok 字串
if((char)USART_ReceiveData(USART3) == 'A')
{
My_Usart3_Printf("ok \n");
}
}
}
全站熱搜


 留言列表
留言列表